Introduction to Mapster in C#: Benefits and Quick Start Guide
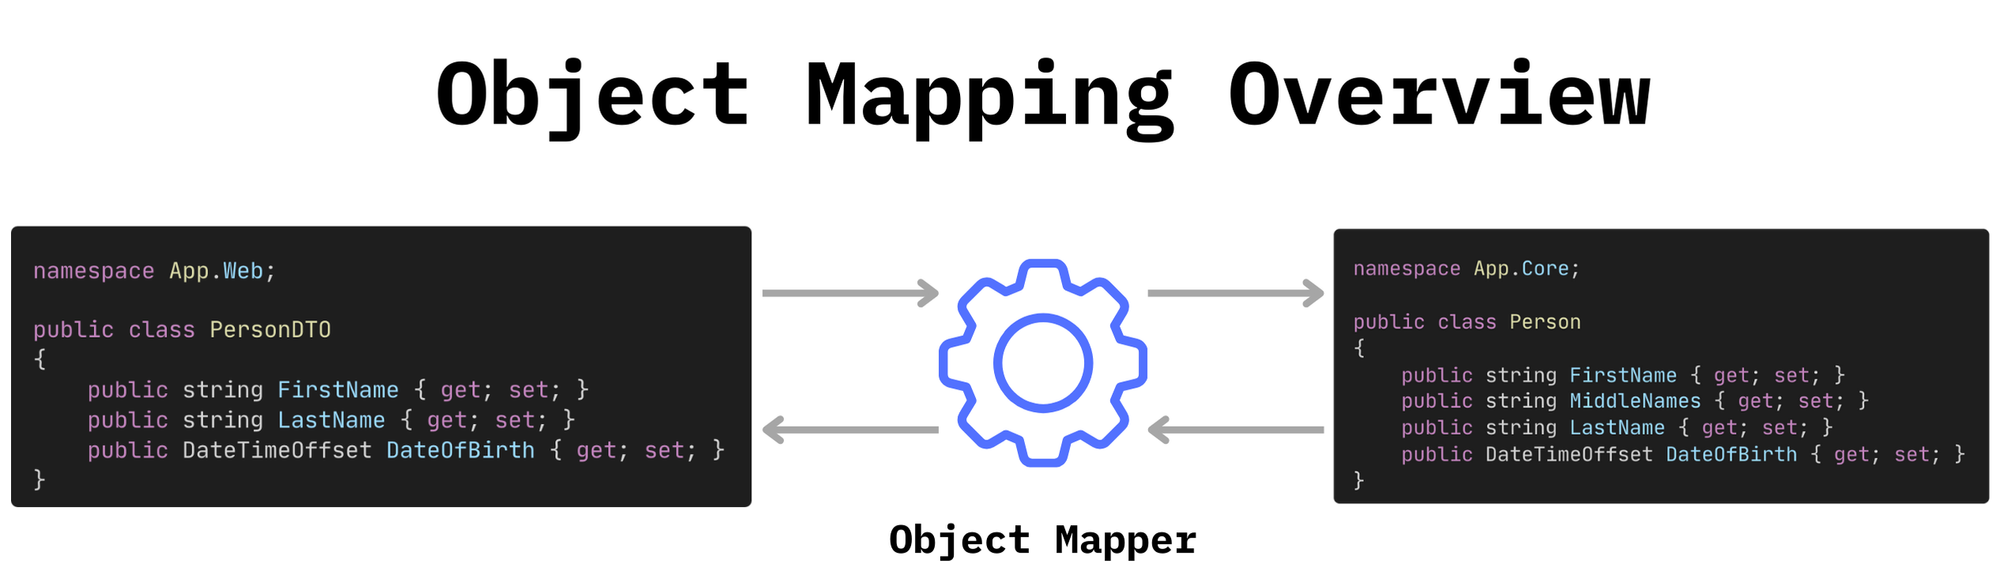
Object mapping is critical in several software design patterns. Whether using Ports and Adapters, Clean Architecture or N-tier Architecture, you're bound to encounter object mapping. This process involves copying data between different types of objects, typically between layers in your application. The diagram below demonstrates how you might use a mapper to map between DTO objects in your Web API project and domain objects in your Core project.
Several object mapping libraries exist in .NET, one of the most popular being AutoMapper. Recently, Mapster has emerged as a high-performance, flexible alternative to traditional options like AutoMapper.
In this article, you'll learn more about Mapster and its benefits over traditional object mapping libraries in C#. You'll then see some practical examples demonstrating how quick and easy it is to use Mapster in your project.
What is Mapster?
Mapster is a versatile object mapping library designed for .NET and is known for its high performance and flexibility. The package offers an efficient alternative to traditional mapping packages. This efficiency is possible because Mapster creates mappings at compile-time using code generation instead of at runtime using reflection, like AutoMapper. The compiled code can map objects faster and more efficiently, reducing memory overhead.
Benefits of Using Mapster
As mentioned briefly above, Mapster comes with several benefits:
- Performance
Mapster's compile-time code generation is significantly faster than traditional reflection-based methods. Mapster does all the heavy lifting of figuring out how to map between objects at compile time and creates a mapping class. This mapping class is significantly faster when mapping objects at runtime than reflection-based mapping. - Flexibility
Mapster offers a Fluent API to create custom mappings for objects with complex mapping requirements. The API provides custom member mapping, conditional mapping, mapping to non-public members and more. However, you're not forced to use this API. If your models are straightforward, you can let Mapster automatically figure out how to map between source and destination objects. - Simplicity
As mentioned in the previous point, just because Mapster offers a flexible Fluent API doesn't mean you must use it. You can get up and running with minimal configuration, and the package is easy to integrate into an existing project with minimal code changes. - Lightweight
Because Mapster avoids using reflection for mapping, it has a light memory footprint. This makes it ideal for applications that map large volumes of objects or have strict memory requirements.
Getting Started with Mapster
You'll now learn how to install Mapster in a C# project and configure basic mappings between objects.
Prerequisites
To follow along with the examples below, make sure you have the latest .NET SDK installed. At the time of writing, this is .NET 8. Ensure you download and install the SDK, not the runtimes.

You'll also need a code editor or IDE that supports C#. Visual Studio Code with the C# Dev Kit extension is a good solution.
Create a C# Console Project
For this article, you must create a new C# Console project. This is the most straightforward, runnable C# project you can make.
Open a new terminal window and run the following command to create the project:
dotnet new console -o MapsterDemoNavigate into the new directory and open it in Visual Studio Code using the following commands:
cd MapsterDemo
code .
Install Mapster
You'll find the Mapster package on NuGet. Install the latest version of the package, which at the time of writing is 7.4.0, using the following command:
dotnet add package MapsterThe command uses the .NET CLI installed with the SDK to add the package to the console project.
Create Classes to Map
First, you'll create two classes between which you want to map data. This is common in layered architecture as it lets you transfer data between layers without exposing underlying business logic or domain models.
First, create a new file called Person.cs and paste the following code for a Person class.
Person.cs
namespace MapsterDemo;

/// <summary>
/// The model object represents a person in your core application logic.
/// </summary>
public class Person
{
    public int Id { get; set; }
    public string FirstName { get; set; }
    public string LastName { get; set; }
    public string SocialSecurityNumber { get; set; }
}
This is your domain model, which sits at the heart of your application and contains all the information about a person, including sensitive information like a social security number. This data might be necessary for the underlying business logic, but you don't want to expose it over a Web API.
To avoid exposing such data over the Web API, create another file called PersonDTO.cs and paste the code for the PersonDTO class:
PersonDTO.cs
namespace MapsterDemo;

/// <summary>
/// This DTO object represents a person in one of your application interfaces
/// such as a Web API.
/// </summary>
public class PersonDTO
{
    public int Id { get; set; }
    public string FirstName { get; set; }
    public string LastName { get; set; }
}
This class looks similar to the Person class, but doesn't contain any properties with sensitive data. You can safely use this class to return a person's details over the Web API without accidentally exposing sensitive information.
Basic Mapping
Now that your classes are set up, you can start using Mapster!
You'll start with a simple example that maps data between objects based on the property name. This means that the FirstName property on the Person class will map to the FirstName property on the PersonDTO class. The same applies to the Id and LastName properties which are present in both classes. Since the SocialSecurityNumber property doesn't exist on the PersonDTO class, it won't be mapped.
In your Program.cs file, paste the following code:
Program.cs
// Import Mapster so you can use the .Adapt<>() method
using Mapster;
using MapsterDemo;

// Create a new person to map
var ivan = new Person()
{
    Id = 1,
    FirstName = "Ivan",
    LastName = "Kahl",
    SocialSecurityNumber = "000000000000",
};

// Map the Person object to a PersonDTO
var ivanDto = ivan.Adapt<PersonDTO>();

// Output the DTO's properties
Console.WriteLine($"ivanDto.Id:        {ivanDto.Id}");
Console.WriteLine($"ivanDto.FirstName: {ivanDto.FirstName}");
Console.WriteLine($"ivanDto.LastName:  {ivanDto.LastName}");
You first add the Mapster namespace so you can access the Adapt<>() method, which you'll use to map between objects. Then, you create a new instance of the Person class called ivan. On line 15, you call ivan.Adapt<PersonDTO>() to create a PersonDTO object from the Person class. Finally, you output each of the properties on the new ivanDto object.
To test the logic, run the application using the command below:
dotnet run
ivanDto.Id:        1
ivanDto.FirstName: Ivan
ivanDto.LastName:  Kahl
Congratulations! Now that you've seen a basic mapping example, you'll learn how to customize the mapping logic in the next section.
Custom Mapping
The classes you want to map between might not look the same in many scenarios. For example, you might want to map between properties with different names.
To demonstrate, open your PersonDTO.cs file and rename the FirstName and LastName properties to GivenName and FamilyName respectively. Also, create a new property called FullName:
PersonDTO.cs
namespace MapsterDemo;

/// <summary>
/// This DTO object represents a person in one of your application interfaces
/// such as a Web API.
/// </summary>
public class PersonDTO
{
    public int Id { get; set; }
    public string GivenName { get; set; }
    public string FamilyName { get; set; }
    public string FullName { get; set; }
}
Now open the Program.cs file and replace the code inside with the following:
Program.cs
using Mapster;
using MapsterDemo;

var ivan = new Person()
{
    Id = 1,
    FirstName = "Ivan",
    LastName = "Kahl",
    SocialSecurityNumber = "000000000000",
};

// Update the Mapster configuration to map Person.FirstName -> PersonDTO.GivenName
// and Person.LastName -> PersonDTO.FamilyName
TypeAdapterConfig<Person, PersonDTO>
    .NewConfig()
    .Map(dest => dest.GivenName, src => src.FirstName)
    .Map(dest => dest.FamilyName, src => src.LastName)
    .Map(dest => dest.FullName, src => $"{src.FirstName} {src.LastName}");

// Map the Person object to a PersonDTO
var ivanDto = ivan.Adapt<PersonDTO>();

// Output the DTO's properties
Console.WriteLine($"ivanDto.Id:         {ivanDto.Id}");
Console.WriteLine($"ivanDto.GivenName:  {ivanDto.GivenName}");
Console.WriteLine($"ivanDto.FamilyName: {ivanDto.FamilyName}");
Console.WriteLine($"ivanDto.FullName:   {ivanDto.FullName}");
Notice how lines 14-18 now have logic to map the properties on the Person class to the appropriate properties on the PersonDTO class. Build and rerun the project using the following commands:
dotnet build
dotnet run
ivanDto.Id:         1
ivanDto.GivenName:  Ivan
ivanDto.FamilyName: Kahl
ivanDto.FullName:   Ivan Kahl
Conditional Mapping
Finally, you'll see how Mapster lets you conditional map properties based on the value of other properties. To demonstrate this, you'll add an optional DateOfBirth property to the Person class and use it to calculate a person's age in the DTO if specified.
Open the Person.cs file and add the DateOfBirth property:
Person.cs
namespace MapsterDemo;

/// <summary>
/// The model object represents a person in your core application logic.
/// </summary>
public class Person
{
    public int Id { get; set; }
    public string FirstName { get; set; }
    public string LastName { get; set; }
    public string SocialSecurityNumber { get; set; }
    public DateTime? DateOfBirth { get; set; }
}
Now open the PersonDTO.cs file and add an Age property:
PersonDTO.cs
namespace MapsterDemo;

/// <summary>
/// This DTO object represents a person in one of your application interfaces
/// such as a Web API.
/// </summary>
public class PersonDTO
{
    public int Id { get; set; }
    public string GivenName { get; set; }
    public string FamilyName { get; set; }
    public string FullName { get; set; }
    public int? Age { get; set; }
}
When calculating the age in Mapster, you have to make sure that the DateOfBirth is specified in the Person class. If it's not specified, you'll leave Age as null.
Update the Program.cs file as seen below:
Program.cs
using Mapster;
using MapsterDemo;

var ivan = new Person()
{
    Id = 1,
    FirstName = "Ivan",
    LastName = "Kahl",
    SocialSecurityNumber = "000000000000",
    DateOfBirth = new DateTime(1995, 8, 7)
};

// Update the Mapster configuration to map Person.FirstName -> PersonDTO.GivenName
// and Person.LastName -> PersonDTO.FamilyName
TypeAdapterConfig<Person, PersonDTO>
    .NewConfig()
    .Map(dest => dest.GivenName, src => src.FirstName)
    .Map(dest => dest.FamilyName, src => src.LastName)
    .Map(dest => dest.FullName, src => $"{src.FirstName} {src.LastName}")
    .Map(dest => dest.Age,
         src => (DateTimeOffset.UtcNow - src.DateOfBirth.Value).Days / 365,
         shouldMap: src => src.DateOfBirth.HasValue);

// Map the Person object to a PersonDTO
var ivanDto = ivan.Adapt<PersonDTO>();

// Output the DTO's properties
Console.WriteLine($"ivanDto.Id:         {ivanDto.Id}");
Console.WriteLine($"ivanDto.GivenName:  {ivanDto.GivenName}");
Console.WriteLine($"ivanDto.FamilyName: {ivanDto.FamilyName}");
Console.WriteLine($"ivanDto.FullName:   {ivanDto.FullName}");
Console.WriteLine($"ivanDto.Age:        {ivanDto.Age}");
Notice on line 22 how you calculate the age only if the DateOfBirth property is not null. The snippet also has a DateOfBirth specified and a Console.WriteLine method to print out the calculated age.
Build and run the application using the following commands:
dotnet build
dotnet run
ivanDto.Id:         1
ivanDto.GivenName:  Ivan
ivanDto.FamilyName: Kahl
ivanDto.FullName:   Ivan Kahl
ivanDto.Age:        28
You should now see the age outputted.
If you set the DateOfBirth to null and rerun the program, you'll notice the age isn't mapped.
dotnet build
dotnet run
ivanDto.Id:         1
ivanDto.GivenName:  Ivan
ivanDto.FamilyName: Kahl
ivanDto.FullName:   Ivan Kahl
ivanDto.Age:
Conclusion
There's a good chance that you'll need an object mapper for any medium- to large-scale project. While you could manually map between objects in code, Mapster makes it easy to automatically map between objects of different types efficiently. The Fluent API also lets you configure custom mapping rules if needed.
Are you using an object mapper in your project? If so, which one are you using, and are you satisfied with it? Please leave it in the comments below.