Python Virtual Environments in Visual Studio
The power and extensibility of Visual Studio make it my favourite IDE. While it originally only officially supported .NET languages, it has grown to support many different platforms including Node.js and Python.
One of the features of Python that Visual Studio has simplified is Virtual Environments. Today I will be walking you through how to create and use Virtual Environments in Visual Studio.
Wait, but what is a Virtual Environment?
A virtual environment is basically a Python binary and collection of site packages that is separate from the global Python binary and site packages installed on a machine.
When you install Python, it creates a global Python binary that you can install packages in. Whenever you install a package in this global Python environment, that package is available to every project that uses that global Python binary. But sometimes we want to have an isolated environment for a project to make it easier to manage packages for that project – this is where Virtual Environments help us. They let us create a copy of the Python binary and place it in its own environment with its own site packages. This environment is not influenced by the global Python environment. Then, when we create a project, we can use our Virtual Environment instead of the global environment.
Prerequisites
virtualenv
In order to create Python Virtual Environments, we will need to install a package called virtualenv globally. To do so, open up a command line instance in Administrator mode and type the following command (note that this requires the Python directory to be in your PATH variable):
pip install virtualenvThis will install the package using the Python package installer.
Python for Visual Studio
Before we can create Python Virtual Environments in Visual Studio, you need to make sure you have enabled the Python extension in Visual Studio when you installed it. If you haven’t, you can run the installer again and modify your existing Visual Studio installation to include the extension.
Once you have installed the Python extension, you will need to create a new Python project.
Creating the Virtual Environment
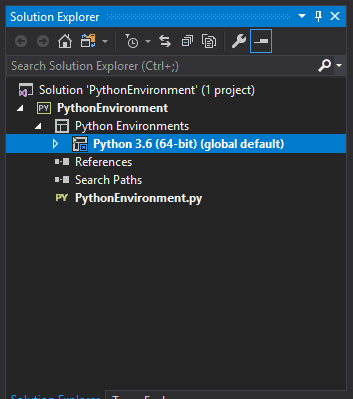
If you look in the Solution Explorer at your new Python project in Visual Studio, you should see a collapsed list item called Python Environments. If you expand it, you will see all the Python environments that are available to this project.

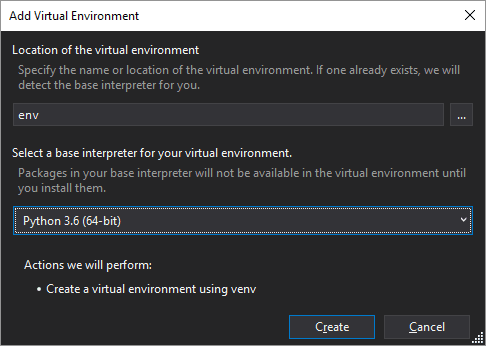
To create a Virtual Environment, right-click on Python Environments and then select Add Virtual Environment. A dialog will display asking you to name the Virtual Environment and select which Python binary to use for the Virtual Environment.

You can leave the name as it is if you like and, depending on your project requirements, select a suitable Python binary to use. When you are finished, you can press Create and your Virtual Environment will be created.
Once the Virtual Environment is created, it should automatically be made the default environment for your project. If it isn’t, you can right-click on the newly created Virtual Environment and select Activate Environment from the context menu.
Now you can run your project in your new Virtual Environment by simply pressing the Start button with the green play button in the top toolbar.
Installing packages in your Virtual Environment
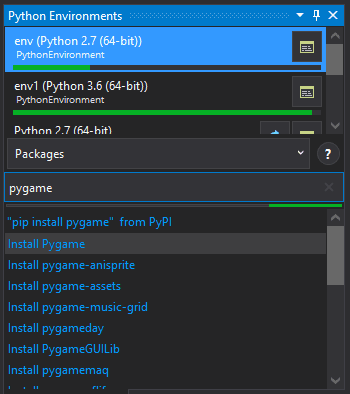
Now that you have created your Virtual Environment, you may want to install packages to use for the project. To do so, right-click on the Virtual Environment and select Install Python Package.... Here you can search for a package on PyPI and simply select it from the list to install it in your Virtual Environment.

Once the package is installed in the Virtual Environment, you can start using it in our project by importing it in your script files.
Conclusion
Visual Studio simplifies both creating and using Python Virtual Environments significantly. As you can see, once you’ve set up the environment, you can forget about it and work on your project.
Please let me know if this tutorial helped you in the comments below. If you have any questions or suggestions, please all leave me a comment below.